
結構前になりますが、こんな記事を見つました。
ArduinoとProcessingを使ってピアノのようなものを作っているようです。
見つけた時に早速やってみるとエラー出まくりで断念。
その時はスケッチが解読ができなかったんですよね。
最近また気になっちゃって、今度こそはと解読しました。
というかこれ回路図もないんですよ・・・
スポンサーリンク
なので最初は回路を書いてみました。
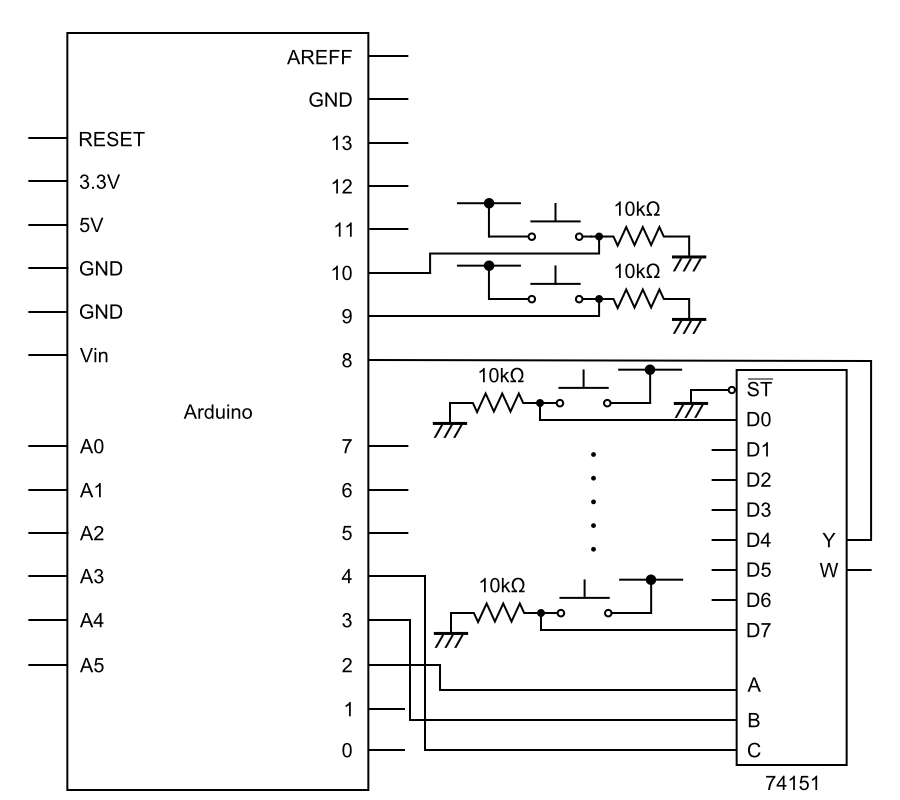
あいにく4051はなかったので74HC151で代用しています。
実体配線はこんな感じに。
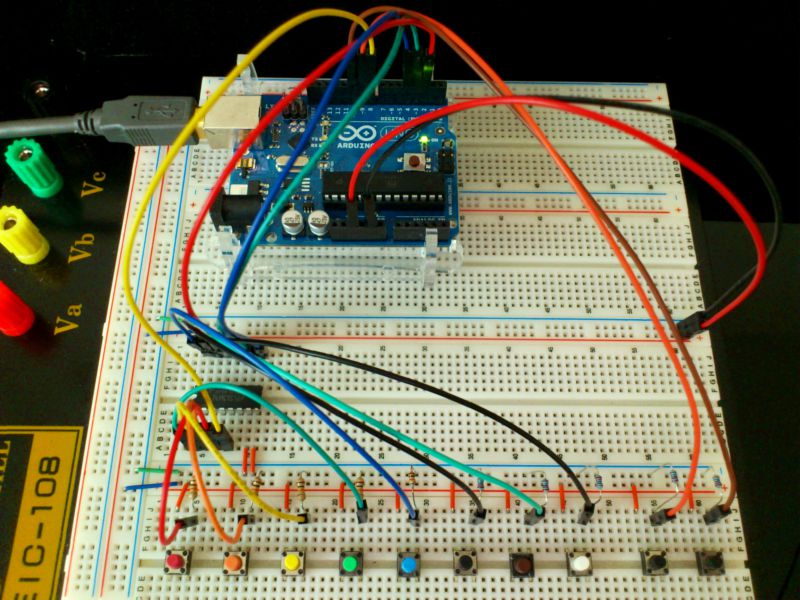
改変後のArduinoとProcessingのスケッチはこうなりました。
Arduino
/**
 * PianoDuino
 *
 * @author   Bruno Soares
 * @link     http://www.bsoares.com.br
 * @language Arduino / C++
 */

#define PIN_SELECTOR0 2
#define PIN_SELECTOR1 3
#define PIN_SELECTOR2 4

#define MUX_OUT     8
#define OCTAVE_DOWN 9
#define OCTAVE_UP   10

// Selectors
byte s0;
byte s1;
byte s2;

void setup() {
  Serial.begin(9600);

  pinMode(PIN_SELECTOR0, OUTPUT);
  pinMode(PIN_SELECTOR1, OUTPUT);
  pinMode(PIN_SELECTOR2, OUTPUT);

  pinMode(MUX_OUT, INPUT);
  pinMode(OCTAVE_DOWN, INPUT);
  pinMode(OCTAVE_UP, INPUT);
}

void loop() {
  for (int cnt = 0; cnt < 8; cnt++) {
    // Extract active bits
    s0 =  cnt       & 0x1;
    s1 = (cnt >> 1) & 0x1;
    s2 = (cnt >> 2) & 0x1;

    // Select input
    digitalWrite(PIN_SELECTOR0, s0);
    digitalWrite(PIN_SELECTOR1, s1);
    digitalWrite(PIN_SELECTOR2, s2);

    // Read input selected
    if (digitalRead(MUX_OUT) == HIGH) {
      Serial.print(cnt);
      while(digitalRead(MUX_OUT) == HIGH);
    }
  }

  if (digitalRead(OCTAVE_DOWN) == HIGH) {
    Serial.print("8");
    while(digitalRead(OCTAVE_DOWN) == HIGH);
  }

  if (digitalRead(OCTAVE_UP) == HIGH) {
    Serial.print("9");
    while(digitalRead(OCTAVE_UP) == HIGH);
  }
}
Processing
/**
 * PianoDuino
 *
 * @author   Bruno Soares
 * @link     http://www.bsoares.com.br
 * @language Processing
 */

import arb.soundcipher.*;
import processing.serial.*;

SoundCipher[] sc = new SoundCipher[8];
Serial port;
int portValue = 0;
int instrument = 0;  // cf. http://www.pluto.dti.ne.jp/~daiki/Midi/IL_ProgramNum.html
int octave = 0;      // cf. http://tonalsoft.com/pub/news/pitch-bend.aspx
void setup() {

  for (int i = 0; i < sc.length; i++) { sc[i] = new SoundCipher(this); } println(Serial.list()); port = new Serial(this, Serial.list()[0], 9600); } void draw() { while (port.available() > 0) {
    portValue = int(port.readString().substring(0, 1));
    switch(portValue) {
      case 0:
        sc[portValue].playNote(0, 1, instrument, octave * 12 + 60, 100, 2.5, 0.8, 50);
        break;

      case 1:
        sc[portValue].playNote(0, 2, instrument, octave * 12 + 62, 100, 2.5, 0.8, 50);
        break;

      case 2:
        sc[portValue].playNote(0, 3, instrument, octave * 12 + 64, 100, 2.5, 0.8, 50);
        break;

      case 3:
        sc[portValue].playNote(0, 4, instrument, octave * 12 +  65, 100, 2.5, 0.8, 50);
        break;

      case 4:
        sc[portValue].playNote(0, 5, instrument, octave * 12 + 67, 100, 2.5, 0.8, 50);
        break;

      case 5:
        sc[portValue].playNote(0, 6, instrument, octave * 12 + 69, 100, 2.5, 0.8, 50);
        break;

      case 6:
        sc[portValue].playNote(0, 7, instrument, octave * 12 + 71, 100, 2.5, 0.8, 50);
        break;

      case 7:
        sc[portValue].playNote(0, 8, instrument, octave * 12 + 72, 100, 2.5, 0.8, 50);
        break;

      case 8:
        octave--;
        if (octave == -6)
          octave = -5;
        break;

      case 9:
        octave++;
        if (octave == 6)
          octave = 5;
        break;
    }
  }
}
あまりProcessingはわかってないんでゴリ押した感がありますが・・・
一応ドレミファソラシドにしました。
9ピンに接続されているスイッチを押すと1オクターブ下がります。
10ピンはその反対で上がります。
他にも色々追加しようと思えばできますが、これぐらいでいいかなと。
スポンサーリンク
すごいと思ったのが
if (digitalRead(MUX_OUT) == HIGH) {
  // 処理
  while(digitalRead(MUX_OUT) == HIGH);
}
というところです。
これでチャタリングもしなくなるし、長押しでも1回だけ反応する(?)ようになります。
なぜかはわかりませんが・・・
PianoDuinoを使えるように改変してみる
スポンサーリンク





Leave a Comment